How to Program a LiftMaster Garage Door Opener: A Step-by-Step Guide (Without Losing Your Mind)
Hey there, fellow DIY warriors! Let’s talk about something we’ve all faced at least once: standing in your driveway, frantically jabbing buttons on a garage door remote like it’s a game show buzzer. Maybe your LiftMaster opener decided to ghost you mid-routine, or perhaps you’re setting up a new system. Either way, programming it doesn’t have to feel like deciphering ancient hieroglyphs. We’ve got your back—and hey, if things go sideways, Atlanta Garage Doors is just a call away (because let’s be real, some days do require a garage door technician).
The Basics: What Makes LiftMaster Openers So Great?
First off, why do we swear by LiftMaster? These badgers are the Swiss Army knives of automatic garage doors. They’re reliable, packed with smart features like Wi-Fi connectivity, and they’ve got a lifespan longer than most Netflix series binges. But even the best tech needs a little TLC now and then. That’s where programming comes in.
Pro Tip: Before you start, grab your opener’s model number (usually on the motor unit) and a ladder. Trust us, scrambling up and down 10 times because you forgot the manual is not a workout we recommend.
Programming 101: Let’s Get This Party Started
Programming a LiftMaster opener isn’t rocket science, but it’s easy to hit a snag if you skip a step. Here’s the no-BS breakdown:
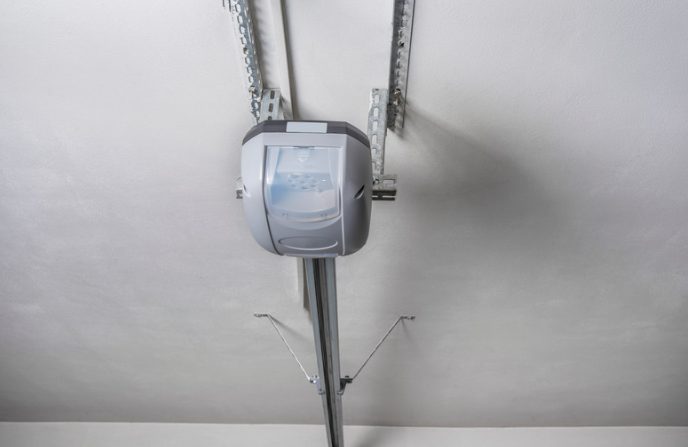
Step 1: Locate the “Learn” Button
Pop open the motor cover (it’s usually on the back or side). You’ll spot a brightly colored button—often yellow, purple, or red—labeled “Learn.” This little guy is your gateway to remote-control harmony.
Step 2: Clear the Opener’s Memory (Like a Digital Exorcism)
Hold down the Learn button for 6–10 seconds until the LED light blinks or turns off. This wipes any old remotes or keypads from its memory. Think of it as a fresh start for your opener’s social life.
Step 3: Pair Your Remote
Press the Learn button once, then within 30 seconds, hit the button on your remote. The motor unit’s light will flash or click to confirm. If it doesn’t? Check the remote’s battery. We’ve all been victimized by dead batteries—it’s basically a rite of passage.
Step 4: Test, Test, Test!
Hit the remote button. Does the door move? High-five yourself. If not, repeat steps 2–3 like your sanity depends on it (because it kinda does).
Common Hiccups (And How to Fix Them)
Even the best garage door opener repair can hit a snag. Here’s what usually goes wrong:
- Dead Batteries: The #1 culprit. Swap ’em out before you rage-quit.
- Signal Interference: Got LED bulbs near the opener? They can block the signal. Replace them with incandescent bulbs—yes, really.
- Misaligned Sensors: Those little eyes near the floor must “see” each other. If the LED is blinking, adjust them until it’s solid.
FYI:
If your door reverses randomly or makes noises like a disgruntled raccoon, call Atlanta Garage Doors. We’re local garage door specialists in Alpharetta, Marietta, and beyond, and we’ve seen it all.
When to Call the Pros (No Shame in It!)
Look, we’re all for DIY spirit. But if your opener’s acting like it’s possessed, or you’re staring at a broken garage door spring, it’s time to tag in a garage door repairman. Why risk a Darwin Award? Atlanta Garage Doors handles everything from garage door installation in Dunwoody to emergency repairs in Sandy Springs. Plus, our technicians are certified LiftMaster whisperers.
Hot Take: Trying to fix a snapped spring yourself is like performing DIY dentistry. Just…don’t.
Keep It Smooth: Maintenance Tips
Want to avoid future headaches? Show your opener some love:
- Lubricate Moving Parts: Use silicone spray on rollers, hinges, and springs twice a year.
- Tighten Hardware: Those noisy vibrations? Tighten bolts and screws every 6 months.
- Test Safety Features: Place a wood block under the door. If it doesn’t reverse on contact, call us—stat.
Fun Fact:
Neglecting garage door maintenance is like ignoring a “check engine” light. It will bite you later.
LiftMaster Models: Quick Reference Table
Lost in a sea of model numbers? Here’s a cheat sheet:
| Model Series | Learn Button Color | Programming Steps |
|---|---|---|
| 8355W | Yellow | Press Learn, then remote within 30 sec |
| 8550W | Purple | Hold Learn 3 sec, then remote |
| 8160W | Red | Press Learn, enter PIN on keypad |
FAQs: Your Burning Questions, Answered
1. “Why won’t my LiftMaster opener work after programming?”
Double-check the remote’s battery and ensure the safety sensors are aligned. If the issue persists, it might be a faulty circuit board—time for a garage door service call.
2. “Can I program multiple remotes?”
Absolutely! Repeat the programming steps for each remote. Just don’t go overboard—nobody needs 15 remotes for one door.
3. “How do I reset the Wi-Fi on my smart opener?”
Open the LiftMaster app, delete the opener, then re-add it. If it’s stubborn, reboot your router. Still stuck? Our Atlanta team’s got your back.
4. “What’s the lifespan of a LiftMaster opener?”
With proper garage door servicing? 10–15 years. Without? Let’s just say…less.
Wrapping Up: You’ve Got This! (But We’re Here Too)
Programming a LiftMaster opener is totally doable—until it isn’t. Whether you’re in Atlanta, Alpharetta, or somewhere between, remember: Atlanta Garage Doors is your go-to for garage door opener repair, installations, and “oh crap” moments. Got questions? We’re just a call away. Now go forth and conquer that opener…or bail and let us handle it. No judgment here. 😉
Final Thought: If all else fails, there’s always the manual. (Kidding—toss it our way. We live for this stuff.)
Related Articles
How To Program LiftMaster Remote
How To Program Multiple Garage Door Openers LiftMaster
How To Program A LiftMaster Garage Door Opener
People Also Ask
To program a LiftMaster garage door opener, start by locating the "Learn" button on the motor unit, typically near the antenna wire. Press and release this button; the indicator light will illuminate or blink. Within 30 seconds, press and hold the button on your remote control until the opener's lights flash or you hear a click, confirming the code is learned. For keyless entry pads, enter your desired PIN followed by the "Learn" button. For detailed instructions on syncing multiple remotes or dealing with specific models, our internal article How To Program Multiple Garage Door Openers LiftMaster provides a comprehensive, step-by-step guide to ensure proper and secure operation.
To pair your garage door remote, start by locating the "Learn" button on your garage door opener motor unit, typically found on the back or side. Press and release this button; an indicator light will usually turn on or blink. Within 30 seconds, press and hold the button on your remote that you wish to program until the opener's lights flash or you hear a click, confirming the pairing. For specific models, especially LiftMaster openers, the exact steps can vary. We have a detailed, step-by-step guide available in our internal article How To Program LiftMaster Remote that covers all common scenarios and troubleshooting tips to ensure a successful sync. Always ensure your remote has fresh batteries before beginning the process.
To reset a LiftMaster garage door opener remote, first locate the "Learn" button on the main opener unit, typically found on the back or side. Press and release this button; the indicator light will illuminate. Within 30 seconds, press and hold the button on your remote until the opener's lights blink or you hear a click, confirming the programming. For newer models with MyQ technology, you may need to use the console or a smartphone app. Always ensure the remote has fresh batteries. If issues persist, clearing all codes by holding the Learn button for about 10 seconds until the light goes out and then reprogramming all remotes is a standard troubleshooting step. For precise steps, consult your model's manual as procedures can vary.
Programming a LiftMaster MyQ garage door opener involves connecting it to your home Wi-Fi network and the MyQ app. First, ensure your MyQ hub or opener is powered and within range of your router. Download the MyQ app on your smartphone and create an account. Follow the in-app setup wizard, which will guide you through selecting your device model, connecting to your Wi-Fi network, and naming your garage door. For detailed steps on syncing remotes and keypads after the main setup, our internal article How To Program Multiple Garage Door Openers LiftMaster provides a comprehensive guide. This process allows you to control and monitor your door from anywhere, receive status alerts, and integrate with other smart home systems for enhanced security and convenience.

